Introduction
Are you going bird watching? If yes, you need functional binoculars. Most of the time, people throw away binoculars claiming that the piece does not function when the problem is as simple as calibration. To calibrate binoculars refers to setting the binoculars to suit your eyes.
If you want a binocular buying guide you can read this article: How to Choose Binoculars: Step by Step Guide.
The process involves setting the focus, adjusting the distance between the eyes, and maintaining these settings. You need to do this well enough to get the best results. Using your binoculars is very fun if the settings are just correct. So how do you calibrate binoculars?
Check the following steps carefully.
Adjustment of barrels
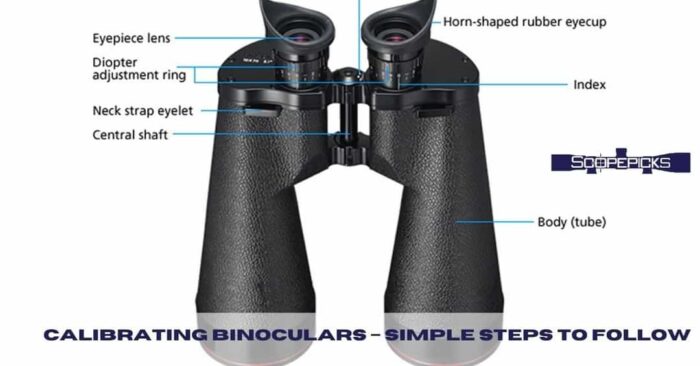
Before you start to calibrate binoculars, know the distance between your eyes, or better still your pupils. Go ahead and adjust your barrels to match this distance. Check to see that this distance is not too close or too far from each other.
First, do you wear glasses or not? If you do, extend the eyecup by rotating them anticlockwise. If you do not, leave them retracted. Extending the eyecup prevents light from outside from interfering with your vision.
Finally, test if your settings work. When you look through the binoculars, then you should see a perfect circle—seeing double images? Readjust the barrels.
Adjust the rubber cups
For comfortable viewing, you can attach the rubber cups provided. Any binoculars that are of high quality have rubber cups attached to them. For users who wear glasses, attach the rubber cups folded backwards. The rubber cups protect you from any injury that can occur when using the binoculars. This is one of the binocular settings that most people take for granted.
How to focus binoculars
Focusing your binoculars is not just rotating knobs. You need to know which knob to rotate and when to rotate it. You can follow the following simple steps when calibrating binoculars.
Check The Focus
Before making any further adjustments check the focus of your binoculars. Find a stationery item or image. Let the image be some distance away from you. Use the binoculars to look at the image. Is the image clear or blurry? Blurred images mean you need to adjust the focus.
If the image is clear, it won’t hurt to get a sharper image. To further determine which lens is erroneous, start by covering the left lens with your hand, then check for the image’s quality. Do the same to the left lens. As a result, you can now know where the problem is.
Adjusting the focus ring
How do you know which of the many parts of the binoculars is the focus ring? At the center of your binoculars, there is a wheel. That is the focusing ring. Its purpose is to center and bring more focus on the image. Start by focusing the image on the left lens.
Once again, cover the right lens with your hand. Rotate the ring from left to right or vice versa until the image comes into focus. Repeat this on the right lens until the image is also in focus. Now look at the image using both lenses and see if your settings have worked.
Adjusting the diopter
Do you see the wheels on the eyepiece? That is the diopter. Everyone has individual differences in the visions on both eyes. You may be wondering what is diopter adjustments on binoculars. Well, the purpose of the diopter is to indemnify this difference.
The aim is to make adjustments on individual barrels at a time. Most diopters are located on the right ocular, with only a handful being on the left. None the less, they all still deliver equally. The trick here is to focus on one eye at a time.
So, once more, start by covering the right lens as you work on the left eye. Rotate the diopter slowly and stop when you see the image is clear. Do the same for the other eye. Once you are satisfied with the clarity of the image, note the diopter settings.
Luckily for you, all binoculars come with markings on the diopter. You do not have to struggle. Note that if the diopter is on the right side, begin adjusting it on that side for easier work.
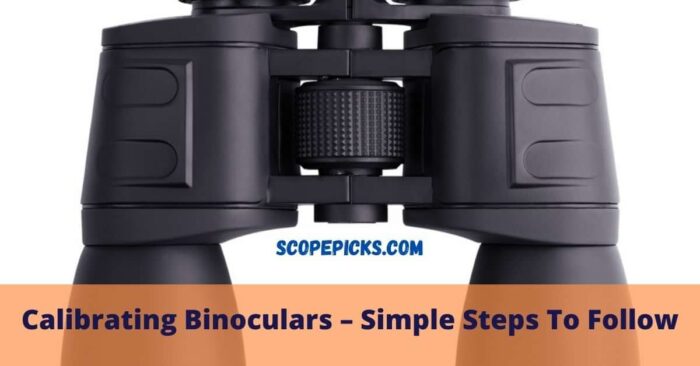
Adjusting the flywheel
The flywheel is centrally positioned in binoculars. This a common feature in the modern models of binoculars. Unlike the diopter that focuses on one barrel at a time, the flywheel focuses both barrels at the same time.
The main goal of adjusting the flywheel is to get more and better details of the image. For researchers who are into finer details, this adjustment is a must. Adjustments that are done by the flywheel give crystal clear images, which is what we all want.
More tips
Remember to clean the lens. At times you may touch the lens leaving oily fingerprints there hence blurring your vision. Consequently, you will try adjusting all settings and still get a poor image.
After adjusting the barrels, rubber cups, the focus ring, the diopter, and the flywheel, you are pretty much done with the calibration.
A common question we get is how to adjust Bushnell binoculars. The answer is simple. Just follow the steps listed above, and you will be good to go.
The final and the most important step is confirming that the setting work for you. Now find another image and use your binoculars to look at it. Make sure it is about thirty to forty feet away from you. Is the image you see clear or not? If it is clear, congratulations to you. You have successfully calibrated your binoculars.
Conclusion
Binocular focus problems are common to many people. So, you need to know how to calibrate binoculars which is no longer be daunting. Take your time when calibrating to get everything right. You will enjoy using your binoculars our door after a good calibration. Keep in mind that the quality of your binoculars plays a vital role when it comes to clear images. Always go for high-quality binoculars if you expect the best results. Finally, poorly set binoculars can cause eye fatigue and even harm your vision. Be careful not to strain your eyes when using binoculars. Now that you about calibrating binoculars, go out and have fun.